How to Learn Guitar by Yourself — A 3-Month Roadmap for Total Beginners
Yes, you can teach yourself guitar. Gear, tuning, your first six chords, the one-minute chord change drill, getting past the F chord, and a weekly plan with a 30-minute routine.
Lots of people buy a guitar, follow a few videos, and quit two weeks later with sore fingertips and no idea what to do next. If you want to learn guitar by yourself, the problem is rarely talent. It's not knowing what to practice, in what order, and for how long. This guide is a complete plan for your first three months as a self-taught guitarist: the gear you actually need, tuning, posture, your first open chords, the drill that makes chord changes fast, how to survive the F chord, reading tabs, strumming, and a week-by-week roadmap with a daily routine. It's written with acoustic guitar in mind, but almost everything applies to electric too.
Can you really teach yourself guitar?
Short answer: yes. Guitar is one of the most commonly self-taught instruments, and it rewards beginners quickly. A handful of chords and one basic strum let you play along with a huge number of songs. That early payoff is a big reason so many people stick with it.
Self-teaching does have real weak spots, though. Nobody corrects your posture. You have to decide what to practice next. And when you hit a wall, there's no teacher to talk you through it, so it's easy to drift away. The fix is to add structure:
- Follow a staged plan so you always know the next step.
- Measure your practice with numbers: chord changes per minute, tempo in BPM, how many times you got through a progression without stopping.
- Film yourself once a week on your phone. You'll spot a collapsed wrist or a buzzing string far more easily on video than while playing.
Set realistic expectations, too. If you practice 20 to 30 minutes a day, a reasonable three-month goal is to switch freely between six to eight open chords, play a few easy songs from start to finish, and get an F chord to ring, even if it's not pretty yet. Everyone progresses at a different pace, but short daily sessions beat a two-hour weekend cram almost every time. Your fingers build strength and memory between sessions, not during one marathon.
What you need to start (and what can wait)
You don't need a pile of gear. The "must-have" rows below are enough to start today.
| Item | Priority | What to look for |
|---|---|---|
| Guitar | Must-have | Low enough string height (action). A basic setup at a guitar shop makes pressing strings dramatically easier and is often the best money a beginner spends. |
| Tuner (clip-on or app) | Must-have | A clip-on tuner reads vibration from the headstock and works even in noisy rooms. A tuner app is fine in a quiet room. |
| Picks | Must-have | Thin to medium (around 0.5–0.7 mm) is forgiving for strumming. Buy a variety pack and compare. |
| Music stand | Recommended | Keeps chord charts at eye level so you don't hunch over. A tablet stand works too. |
| Capo | Later | Raises the key so you can keep using easy chord shapes. Pick one up around month two when you start playing along with songs. |
| Spare strings, strap | Later | Change strings when they sound dull or one breaks. Get a strap if you want to play standing. |
Still choosing between acoustic and electric? Read our electric vs. acoustic guitar comparison first. Electric guitars usually have lighter strings and lower tension, so they hurt less at the start. Acoustics are ready to play with no amp and sound great for accompanying singing.
Tuning (EADGBE), posture, and both hands
Standard tuning
The thickest string is the 6th string and the thinnest is the 1st string. Standard tuning, from 6th to 1st, is E–A–D–G–B–E. A classic way to remember it is "Eddie Ate Dynamite, Good Bye Eddie." Turn on your tuner, pluck one string, and slowly turn the tuning peg while watching the note name and needle.
- If the note is sharp, loosen. If it's flat, tighten. It holds better if you tune up to the note from slightly below rather than down from above.
- New strings stretch and go flat quickly. For the first few days after a string change, tune before and after each session.
- Make tuning the first thing you do every time. Practicing on an out-of-tune guitar trains your ear to accept the wrong sound.
Sitting posture
Sit on a chair without armrests and rest the guitar's waist (the narrow curve of the body) on your right thigh if you're right-handed. Angle the neck slightly upward. Keep the top of the guitar close to vertical, facing outward, not tilted up toward the ceiling. Tilting the guitar back so you can see the fretboard is the most common beginner habit, and it bends your fretting wrist into a position where chords are much harder. If you need to look, tip your head, not the guitar.
Fretting hand basics
Place your thumb roughly in the middle of the back of the neck. Press the strings with your fingertips, fingers arched, not with the flat pads. Press just behind the fret (on the side closer to the headstock, right next to the metal fret wire); that spot needs the least pressure for a clean note. Keep a little space between your palm and the neck, as if you were holding an egg there, so your fingers stay curved and don't mute neighboring strings. Finger numbers: index 1, middle 2, ring 3, pinky 4.
Picking hand basics
Hold the pick between your thumb and the side of your index finger, with only about 2–3 mm of the tip showing. Strum from the wrist, like shaking water off your hand or turning a doorknob, instead of swinging your whole arm from the elbow. Strumming near where the soundhole meets the end of the neck gives a balanced tone.
Beginner guitar chords: your first six open chords
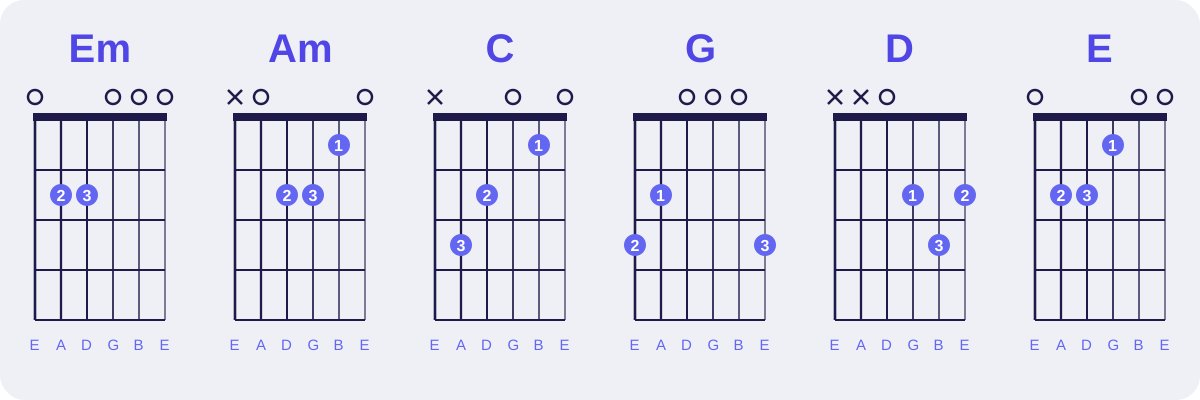
The rule for first chords is simple: start with shapes that use few fingers. The order this guide recommends is Em → Am → C → G → D → E. Em needs only two fingers and you strum all six strings, so it's the ideal first chord. E is Em plus one finger, so it comes almost for free at the end.
| Chord | Frets (6th → 1st string) | Tips |
|---|---|---|
| Em | 0-2-2-0-0-0 | Middle finger on the 5th string, 2nd fret; ring finger on the 4th string, 2nd fret. Strum all six. |
| Am | x-0-2-2-1-0 | Move the Em shape down one string each and add your index on the 2nd string, 1st fret. Skip the 6th string. |
| C | x-3-2-0-1-0 | Ring on 5th string, 3rd fret; middle on 4th, 2nd fret; index on 2nd, 1st fret. Keep the ring finger arched so it doesn't touch the 4th string. |
| G | 3-2-0-0-0-3 | Middle on 6th string, 3rd fret; index on 5th, 2nd fret; ring on 1st, 3rd fret (some players use the pinky instead). |
| D | x-x-0-2-3-2 | Index on 3rd string, 2nd fret; ring on 2nd, 3rd fret; middle on 1st, 2nd fret. Strum from the 4th string down. |
| E | 0-2-2-1-0-0 | The Em shape plus your index on the 3rd string, 1st fret. |
Once you have a shape, pick each string one at a time. If a string thuds instead of ringing, either the finger on that string isn't pressing hard enough or a neighboring finger is touching it. This string-by-string check is the single most reliable way to make your chords sound clean.
The one-minute chord change drill
Holding a chord is step one. The real challenge is moving between chords quickly, because that's where songs fall apart. The most effective drill is the one-minute change: pick two chords and count how many times you can switch between them in sixty seconds.
- Pick two chords Start with Em ↔ Am. Later move to C ↔ G, G ↔ D, and Am ↔ E.
- Set a one-minute timer Strum once each time you land a chord, switch, strum again. Count every switch.
- Accuracy before speed Racing until your fingers land in the wrong place doesn't help. Aim for all fingers dropping onto the strings together, as one shape.
- Write down the number Log the date and count. Ten or so changes on day one is completely normal. Adding even one or two a day feels like a different instrument two weeks later.
- Two or three pairs, one minute each Keep it short and focused, then stop. Daily repetition beats long grinding sessions.
Sore fingers, calluses, and getting past the F chord
Sore fingertips are normal
Almost every beginner has tender fingertips for the first two or three weeks. With regular practice, calluses usually form over a few weeks, and the soreness fades noticeably after that. To make that stretch easier:
- Split practice into two 15–20 minute sessions instead of one long one.
- Don't press harder than you need to. Finding the minimum pressure that gives a clean note is a skill in itself.
- If your guitar's action is high, get a setup at a guitar shop or switch to a lighter string gauge.
A step-by-step path to the F chord
The F chord is the first big wall for self-taught guitarists. The standard F (1-3-3-2-1-1) is a barre chord: your index finger presses all six strings at the 1st fret. At first, several strings usually come out muted. Almost nobody gets it in a day or two, so plan on two to four weeks and use stepping stones:
- Start with Fmaj7 (x-x-3-2-1-0) No barre, and it sounds close enough to stand in for F in most songs while you're learning.
- Small F (x-x-3-2-1-1) Ring on the 4th string, 3rd fret; middle on the 3rd string, 2nd fret; index flattened across the 1st and 2nd strings. This is a mini barre that teaches your index to cover two strings at once.
- Five-string F (x-3-3-2-1-1) Move the ring finger to the 5th string, 3rd fret and add your pinky on the 4th string, 3rd fret. Your index still covers only the top two strings.
- Full barre F (1-3-3-2-1-1) Finally, lay your index across all six strings.
For the full barre, use the bony side of your index finger, rolled slightly toward the thumb, not the soft middle of the pad. That keeps strings from falling into the creases of your knuckles. Put your thumb behind the neck a little lower than your index, and instead of squeezing with your hand, let the weight of your arm pull the guitar gently toward you. It's far less tiring. Keep the index as close to the fret wire as possible. Two or three minutes of "hold F, check each string" at the end of every session is enough to make steady progress.
How to read guitar tabs and chord charts
Most self-study material uses tablature (tab) and chord charts rather than standard notation. You can learn to read both in about ten minutes.
Chord charts
A chord chart is a picture of the neck standing upright, facing you. The six vertical lines are strings (thick 6th string on the left), the horizontal lines are frets, and the thick line at the top is the nut. Dots show where to press, numbers inside the dots are finger numbers, an O above a string means play it open, and an X means don't play it. Barre chords show a bar across several strings, and chords higher up the neck have a label like "5fr" to show the starting fret.
Tablature
Tab also uses six horizontal lines for strings, but here's the catch: the top line is the thinnest 1st string and the bottom line is the 6th, the opposite of how it looks when you glance down at your guitar. Numbers on the lines are fret numbers (0 means open), and numbers stacked vertically are played together. That top-to-bottom flip trips up nearly every beginner, so lock it in early.
Tab's big weakness is that it often has little or no rhythm information. It tells you where to put your fingers, but not how long to hold a note or which beat it lands on, so you end up guessing from the recording. Over time, learning to read note lengths and time signatures makes everything easier. If you want the basics, see our guide to reading sheet music.
Strumming and rhythm: half of good accompaniment
Clean chords with a shaky rhythm don't work as accompaniment. Slightly messy chords with a steady rhythm actually sound pretty good. That's why it pays to practice strumming alongside chords from day one, not after.
- Stage 1: quarter-note downstrokes — With a metronome at 60 BPM, strum down once per beat while counting "one, two, three, four" out loud.
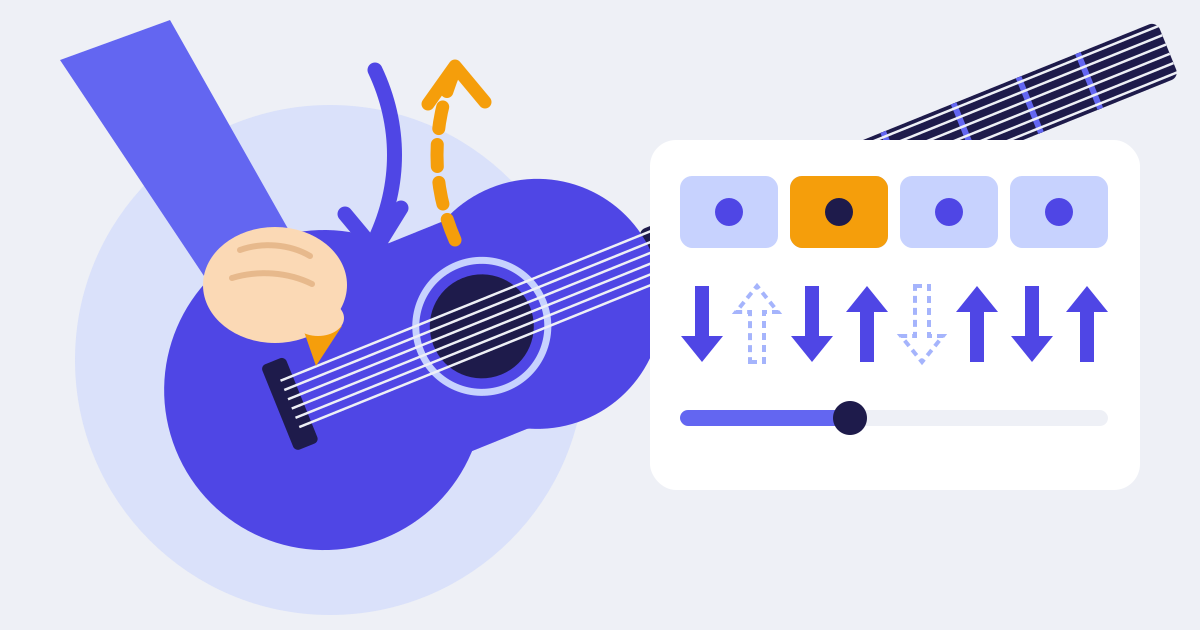
- Stage 2: eighth-note down-ups — Same 60 BPM, down on each beat and up on each "and." Keep your wrist moving down and up continuously, even between strums.
- Stage 3: the classic pattern — "Down, down-up, up-down-up." Your hand keeps moving in eighth notes, but on beat three you swing past the strings without hitting them.
Written as rhythm, that stage-three pattern is a quarter note, two eighth notes, an eighth note tied over into beat three, then three more eighth notes. Learning it by ear alone, most people rush or drag the upstrokes. This is where Rhythm Helper can help: enter those notes in 4/4 and play them back. It highlights the note you should be playing right now and clicks the rhythm exactly as written, so you can see and hear which beat is a ghost swing and which one you actually strike. Start around 60 BPM and nudge it up 5 BPM at a time once it feels easy. For more patterns and a step-by-step method, read our guitar strumming rhythm practice guide. To build your sense of time in general, check out how to practice rhythm and timing.
A 3-month roadmap and daily guitar practice routine
Week-by-week plan
| Weeks | Goals | Checkpoints |
|---|---|---|
| 1–2 | Tuning, posture, Em and Am, quarter-note downstrokes | Tune all six strings on your own / start logging Em ↔ Am one-minute changes |
| 3–4 | Add C and G, eighth-note down-ups | C ↔ G one-minute changes / one full minute of eighth-note strumming at 60 BPM |
| 5–6 | Add D and E, first song (e.g., a G–Em–C–D progression) | Four times through the progression without stopping |
| 7–8 | Classic strum pattern, using a capo | "Down, down-up, up-down-up" around 70 BPM / play one song start to finish |
| 9–10 | F chord prep (Fmaj7 → small F → five-string F) | Small F with clean 1st and 2nd strings |
| 11–12 | Full barre F, songs with F (e.g., C–G–Am–F) | Four times through a progression with F / film yourself and compare with week 1 |
Treat the schedule as a guide, not a deadline. If you get stuck, stay on a stage for an extra week. If something clicks quickly, move ahead.
A 30-minute daily routine
| Time | Activity | How |
|---|---|---|
| 3 min | Tune and warm up | Always tune first. Gently open and close your hands to loosen up. |
| 5 min | Finger exercise (1-2-3-4 chromatic) | Frets 1–4 on the 6th string with fingers 1–4, then move string by string to the 1st. One note per beat at 60 BPM. |
| 7 min | One-minute chord changes | Two or three chord pairs, two rounds each, log the counts. |
| 7 min | Strumming and timing | Today's pattern with a metronome or rhythm playback. Drop the BPM if you keep slipping. |
| 8 min | Song practice | An easy song using your chords. Practice keeping going through mistakes. |
On busy days, do a 10-minute version: one minute of tuning, four minutes of chord changes, five minutes of a song. The costliest habit in guitar practice is "I don't have 30 minutes, so I'll skip today." Even five minutes with the guitar in your hands keeps the streak, and the progress, alive.
Common mistakes self-taught beginners make
- Skipping tuning — Your ear gets used to wrong notes. It takes thirty seconds; do it every time.
- Tilting the guitar to see the fretboard — Your wrist bends and chords get harder. Keep the guitar upright and tip your head.
- Practicing chords one at a time — This is why people can hold every chord but can't play a song. Drill changes between pairs from the start.
- Going too fast — Practicing mistakes at speed bakes them in. Start at a tempo you can play cleanly and add 5 BPM at a time.
- Freezing the strumming hand — Keep the wrist moving on beats you don't strike, or the rhythm falls apart.
- Restarting after every mistake — Keeping the beat and moving to the next chord after a slip is the real skill of accompaniment.
- Quitting at the F chord — Taking weeks is normal. Substitute Fmaj7 and keep playing songs while you work on it.
Teaching yourself guitar comes down to order and consistency, not talent. Today, try one minute of Em ↔ Am changes and write down the number. Three months from now, that log will be the best motivation you have.
Frequently asked questions
How long does it take to learn guitar by yourself?
With 20–30 minutes of daily practice, most beginners can strum through an easy song with three or four open chords at a slow tempo within one to two months. Playing comfortably through songs with an F chord realistically takes three months or more. It varies with practice time and the person.
Is acoustic or electric guitar easier to teach yourself?
Electric guitars usually have lighter strings and lower tension, so early finger soreness is milder. Acoustics need no amp and suit singing along. The guitar that matches the music you want to play is the one you'll keep picking up.
My fingers hurt when I play guitar. Should I keep going?
Stinging fingertips are a normal part of building calluses, so keep practicing in shorter sessions. If you feel numbness or sharp pain in your wrist or arm, stop and rest; that usually points to posture or grip pressure, and you shouldn't push through it if it persists.
How do I play the F chord as a beginner?
Start with Fmaj7 (x-x-3-2-1-0) and the small F (x-x-3-2-1-1), then add strings gradually. Use the bony side of your index finger, keep it right behind the fret, and pull with arm weight instead of squeezing. Two to four weeks is typical.
How many minutes a day should a beginner practice guitar?
Aim for 20–30 minutes every day. If your fingers are sore, split it into two 15-minute sessions. Short daily practice is more effective for strength and memory than one long weekend session.
Can I learn guitar using only tabs?
Tabs are great for learning where to put your fingers, but they often leave out rhythm, so you'll need to listen to the recording for timing. Learning to read basic note lengths and time signatures makes strumming patterns much easier to pick up.